Super Quick Launch toolbar for free
If you're like me, you probably have numerous key applications that you use on a regular basis. In fact, you may even have them on your Quick Launch taskbar. But what if you could categorize them? Or make sub-folders that opened when you clicked on them? Here's how to do it...
The first step is to hijaak the Links toolbar. It behaves differently than the Quick Launch or any custom toolbar. I'll explain how in a bit. Right click on the Windows taskbar and add the Links toolbar. I'd recommend turning the title and text off to make the toolbar smaller. You'll notice that you now have a toolbar with (likely) a bunch of IE icons and it's near impossible to distinguish between them at just a glance.
Next, remove (or move) the links that are there and create folders. Create as many as you like and name them accordingly. Create shortcuts to your favourite applications or web sites and put them in the appropriate folder. Your toolbar should now look like a bunch of folders. Here's where the unique behavior comes in. If you click on a folder, you should notice that it opens a menu with the list of shortcuts inside instead of actually opening the folder in Explorer.
The next step is to set the icon to be used for each folder so that you can actually tell them apart. In each folder, you will need to create a new file called desktop.ini. In the properties of the file (right click on the file and click on properties), it should be set to Hidden. This will prevent the file from appearing in the list of shortcuts on the toolbar.
The file should contain the following lines:
[.ShellClassInfo]

InfoTip=E-mail and Messenger

IconFile=C:\Program Files\Microsoft Office\Office\OUTLOOK.EXE

IconIndex=0

ConfirmFileOp=0
The InfoTip will be the text that appears in the tooltip when you hold your mouse over the button. The IconFile represents the path to where the file is stored. Since a file may have more than one icon stored within it, the IconIndex points to the correct icon. ConfirmFileOp prevents a warning from appearing that this is a system folder.
"How come the icon isn't appearing?", you ask. There's one last step: we need to specify that the folder is a system folder. In my version of Windows 2000, you have to hop down to the command prompt to do this. Click Start>Run and type in 'cmd'. In the command window, you'll need to change to the directory that your folder is in. For those who don't remember the DOS days, type in 'cd \documents and settings\mylogin\favorites\links' where mylogin is the username you use to log into windows. Once you're in the right directory, type 'attrib +s myfolder' where myfolder is the name of the folder. If you have a bunch of folders you can do 'attrib +s *.*' to change all the folders to system folders.
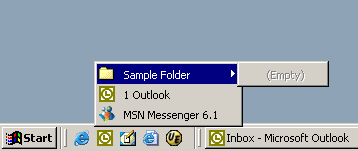
You should now see the correct icons in the toolbar! Here's an example of how it should look:
Conversation
In order to get this to work on my system, I had to use the attrib /d switch, which told it to attrib the specific directory and not the files contained inside. Otherwise, it was a very slick hack. Thank you.
I wonder you stil use 98x ? or that is just a pic?
Considering this post is from 2004? Yeah, I've moved on. I'm on XP now (maybe Vista soon). But I still use the same technique.